Rejections Process for FRs

This page will explain how to reject FR applications. The first step is to consider the attached applications.

ALWAYS BEGIN THE REJECTION PROCESS IN CMS.

These instructions are for CMS applications only. For paper applications see Legal and Plans Officers - Post Intake Rejections

Rejecting attached applications

If there are applications attached to the FR then these will need to be dealt with before rejecting the FR case. Follow the relevant process below.

  • Dealings attachments

     Dealings attachments

    If there are DW applications attached to an FR then these applications need to be detached and dealt with before rejecting the FR case.

    • If the attached applications are CMS DW cases, then follow this process:
      • Detach the DWs from the FR on LRS.
        • If there are multiple applications attached, you only need to detach the relevant one(s).
      • If there is an associated LR-id (CMS DW) then follow these instructions BEFORE rejecting the FR.
        • You do not need to refer the prior to rejecting so ignore the first few steps in the DW process. 
      • Begin the FR rejection as per the 'CMS FR Rejection Process' below.
    • If the attached applications are non-CMS "Paper" DW cases, then follow this process:
      • Detach the DWs from the FR on LRS.
        • If there are multiple applications attached but not all are being rejected, you only need to detach the relevant one(s).
      • Do a document request on CMS.
        • Ensure that all of the cases including the DW are delivered to you.
        • Complete the Document Request Process and wait until Document services complete the whole cycle.
        • You should only return the CMS FR case to Document Services.
        • You should retain the paper DW to be rejected.
      • Once Document Services have acknowledged receipt of the case and the Document Request is closed .
        • Complete the rejection letter for the DWs and pass the physical case to the rejection team as per current paper case practice. They will complete the rejection process and return the DWs to the agent.
      • Begin the FR rejection as per the 'CMS FR Rejection Process' below.
      • If you are working in SVP, contact an MBH Business Lead to arrange the document request before beginning the rejection process. 
  • First Attached 

     FA attachments

    Follow these instructions when rejecting any FA application. Where the FR application is live, detach the FA from the FR on LRS. before following these instructions. If there is an FA to be rejected, then the main difference is to ensure that the Title is not closed/cancelled.

    • If there is an FA to be rejected, follow this process:
      • Reject in CMS
        • Depending on the scenario, follow the full or partial rejection process in CMS before cancelling the LRS application.
        • If you are not sure which process to follow then refer the case to your referral point.
      • Refer to Plans

        • (there is no allocated officer for the duty - any plans officer within the service teams can deal with the case).
        • Enter note for plans rejection officer in application workdesk (right click for picklist and select Cancellation Instructions to plans).
        • Refer to plans rejection officer under Plans Settle.
        • Plans rejection officer will release to Legal Cancel.
      • Update and cancel LRS

        • Take on LRS application at Legal Cancel.
        • Open LRS application workdesk.

        • Change category to CP/CL/CI.

        • Add rejection details to prefix field of property description (right click for picklist and select for DW and DW type applications (application being cancelled)), complete reason and date.

        • Add N&I to application workdesk (right click for picklist & select cancel separate DW/FA/TA) and complete all fields.

        • Release case to Despatch Cancel and OK warning title not confirmed.

        • Take on case at Despatch Cancel.

        • Click cancel in application workdesk.

      • If necessary, refer to instructions to cancel any shared plot application.

      • Email Sasine Enquiries in the following terms to get closing note cancelled.
        • To:Sasine Enquiries


          Subject:Closing Note - Application Rejected
          Email Content:

          County:

          Search Sheet:

          Title Number:

          Please amend closing note to read 'application rejected on dd/mm/yy'

          LRS Cancellation Date:

  • Shared Plot/Other applications

    • If there are shared plot applications or other additional LRS applications that are not part of any CMS case then refer to the appropriate referral point for further guidance.

  • FR valid but attachments invalid

    • If it is only the attachment that is to be rejected, follow the relevant processes above to reject the invalid cases. Then continue to process the FR and any other valid applications as normal.
    • If only part of the FR CMS case is being rejected but the remaining FR and attached applications can continue to be registered then reject the invalid part as per the 'CMS FR Partial Rejection Process' below.

Rejecting FR applications

Once you have dealt with any attachments, follow the relevant (Full or Partial) process below to reject the FR application.


 FR Full Rejection

CMS FR Full Rejection Process

  • Where you are rejecting a paper DW as well as the FR, only begin the FR rejection once Document Services have acknowledged receipt of the Document Request for any attached DW cases AND they are closed
  • In CMS, click Reject in the Actions menu.
    • Do not make any changes to the LRS application at this stage.
    • ALWAYS begin the rejection process on CMS before making any edits to LRS.
  • Click Yes when it asks "are you sure you want to start the rejection process?".
  • Click Reject for all the applications.
  • Start typing the rejection reason then select the appropriate one from the dropdown list that appears.
  • Enter the rejection reason text to appear in the letter in the Rejection Notes. You can copy this from the Common Rejection Reasons page.
  • To include multiple rejection reasons, click on 'Add a new rejection reason'.
    • For example, if there is no witness on the deed you will need to have 3 rejection reasons - Witness is not named, Witness is not designed and Witness has not signed.
    • There are some rejection reasons that are not currently available on the dropdown list.
      • If you can't find a relevant reason then Refer the case for guidance.
      • Only as a last resort, select "other" as the reason and type your reason manually. 
  • If there is nothing wrong with an application but it is being rejected as it is dependent on another application which is being rejected (e.g. a valid Standard Security dependent on a Disposition that is being rejected) then use the following rejection reason "Application dependent on the registration of another application that has been rejected (contains no other error)". There will be NO additional rejection fee for this application.
  • Click Submit.
  • If your case has an LRS Application then at this point you will need to perform the required steps to cancel the LRS application. CMS will show an "Update External Systems" screen as a reminder at this stage.

Rejection from Register

  • Enter Note for Plans Officer in the LRS title workdesk.
  • Refer the LRS application to Plans Settle.
    • (there is no allocated officer for the duty - any plans officer within the service teams can deal with the case).


Rejection from Plans (both if own case, or referred from Register):

In Plan Approver/Plan Creator:

  • Take the application on at Plans Cancel.
  • Follow the process in the appropriate flow chart:


 FR or VR applications


 standalone FA or VA applications


  • Please note that once an approved plan has been cancelled in the Plan Viewer, it may take 10 minutes for the original COF/DCU to re-appear. The cancelled title entry on the index layer will show status XX for rejection.
  • Release LRS application to Legal Cancel.


Next steps for Register OR Plans

  • In LRS, take application on at Legal Cancel.
    • Change the category to CL (Register), or CP (Plans) (if this hasn't already been done).
    • Add a Title Workdesk N&I note, Right click and pick the 'cancelled title FR/TP' note.
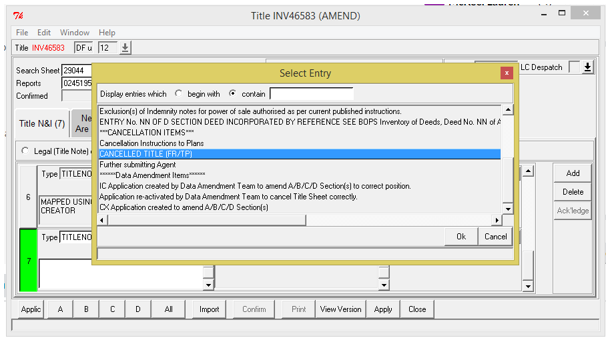
    • In the box that opens complete the rejection reason and the relevant details of the case from the Disposition & Application Form, then delete any unnecessary boxes.
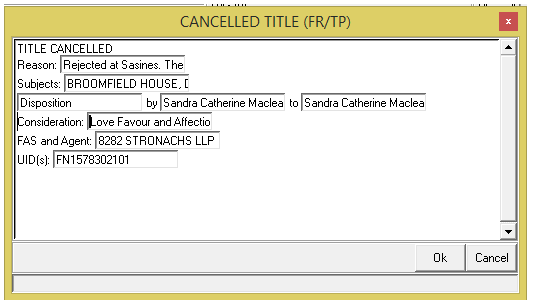
    • Click OK to acknowledge the note.
    • Delete entries in A-D Sections
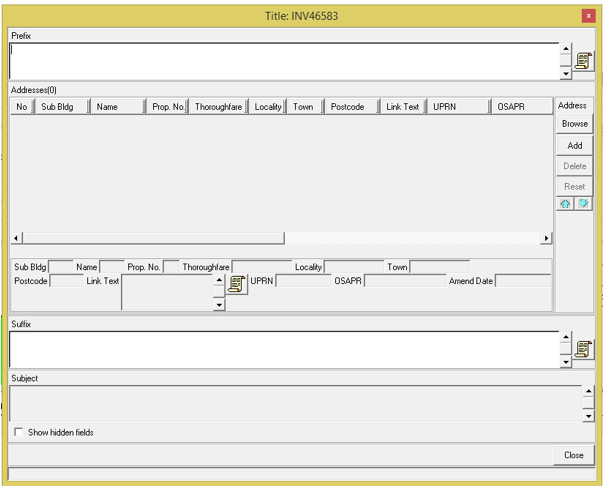
    • In the A Section, delete the Interest/Real Right field if it has been previously completed
    • In the A Section Details, delete any existing info in Prefix and Suffix and delete all addresses.
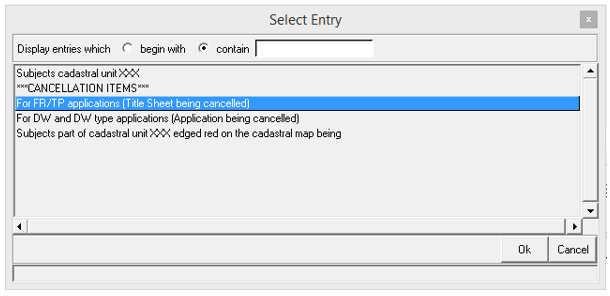
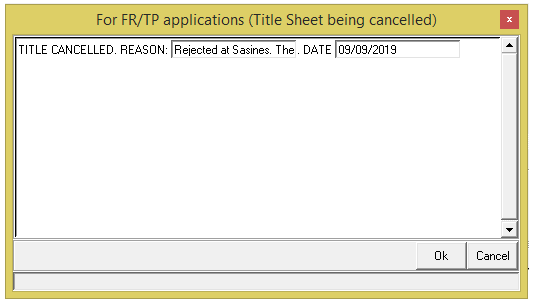
    • In Prefix field, right click to get the picklist and select For FR/TP applications (title sheet being cancelled).
    • Complete the template with the rejection reason and date.
    • Take a note of the search sheet number.
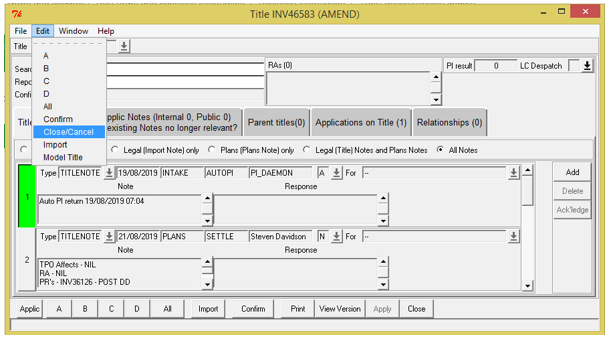
    • In the title workdesk, from the menus, click edit, then select 'close/cancel'.
    • In the pop up window, click Cancel and add the date of rejection.
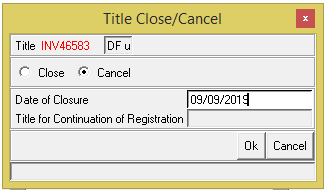
    • Click OK and again when prompted - this is a safety measure built in to make sure you definitely want to cancel the applicaiton.
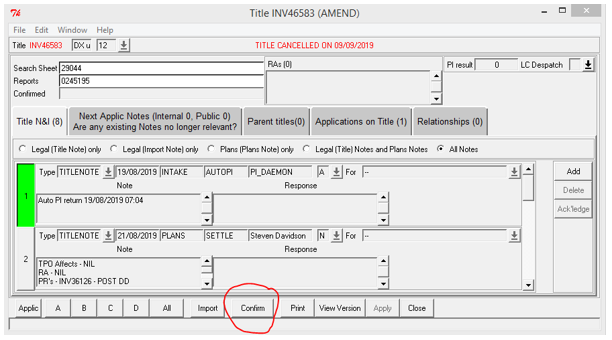
    • Re-open application and return to the title workdesk.
    • Click confirm in title workdesk and OK to validation prompt.
    • Release the LRS application to Despatch Cancel.
    • Take on the LRS application at Despatch Cancel.
    • Open the application workdesk for the application. 
    • Click Cancel.
      • At this point the application will show as status X.
      • If necessary, refer to instructions in manual for any shared plot applications.
  • On CMS, click Submit.
  • On the next screen review rejection reasons and explanation text.
    • If the text does not need to be amended, click Submit.
    • If you need to amend the explanation text click Amend Explanation. 
      • This makes the text editable.
      • If you picked Other as the rejection reason or one of the reasons where text needs to be "deleted as appropriate" then the text will already be editable and there will be no Amend Explanation button.
    • Amend the text as required and click Submit.
  • On the next screen review the notification email addresses and addresses to ensure these are correct. If email details are populated the Rejection letter will be emailed.
    • To modify the notification details click Amend.
    • Update the existing email address or add new ones in. (E.g. if there are additional handwritten email addresses on the form then you should add these at this point).
    • You can also change how the agent will receive the notification i.e. email or post.
      • To change the postal address click 'Add new FAS address' and click Done when you have made the changes.
    • If there is another agent that requires to be notified of the rejection in addition to the presenting agent then also add their email address at this point.
    • If it has been decided that the agent wishes to be communicated with via post and not by email then add instructions for Document Services in the 'Note for Despatch Team' box.
    • Once all correspondence information has been updated, click Submit.
  • The Finalise Rejection Correspondence page is the final opportunity in the process to review and make any amendments to the rejection correspondence.
    • To make changes click 'Amend Correspondence'.
      • Make any relevant changes.
        • e.g. entering the UID for the cheque overpayment type letters or add additional text.
      • Click Save.
      • Click on 'Correspondence' link to toggle back and forth between the correspondence generated and the edit screen if necessary.
    • When the correspondence is accurate, click Submit.
  • On the next screen to finalise the rejection, click Submit.
    • There is an opportunity at this stage to Save or Cancel the rejection.
  • The application(s) that have been rejected will now be titled Rejected in the APF Documents side bar.
  • The rejection letter that has been produced will now appear in the supporting documents section.
  • If there are supporting documents then you will need to categorise these for archiving then click Submit to resolve the case.
  • Email Sasine Enquiries in the following terms to get closing note cancelled.
    • Example template email

      To:Sasine Enquiries


      Subject:Closing Note - Application Rejected
      Email Content:

      County:

      Search Sheet:

      Title Number:

      Please amend closing note to read 'application rejected on dd/mm/yy'

      LRS Cancellation Date:


 FR Partial Rejection

CMS FR Partial Rejection Process

  • Where you are rejecting a paper DW as well as the FR, only begin the FR rejection once Document Services have acknowledged receipt of the Document Request for any attached DW cases AND they are closed
  • In CMS, click Reject in the Actions menu.
    • Do not make any changes to the LRS application at this stage.
    • ALWAYS begin the rejection process on CMS before making any edits to LRS.
  • Click Yes when it asks "are you sure you want to start the rejection process?".
  • Click Reject for the applications which need to be rejected.
  • Click Pass for the applications which will continue to be processed once the rejection is completed.
  • Start typing the rejection reason then select the appropriate one from the dropdown list that appears.
  • Enter the rejection reason text to appear in the letter in the Rejection Notes. You can copy this from the Common Rejection Reasons page.
  • To include multiple rejection reasons, click on 'Add a new rejection reason'.
    • For example, if there is no witness on the deed you will need to have 3 rejection reasons - Witness is not named, Witness is not designed and Witness has not signed.
    • There are some rejection reasons that are not currently available on the dropdown list.
      • If you can't find a relevant reason then Refer the case for guidance.
      • Only as a last resort, select "other" as the reason and type your reason manually. 
  • If there is nothing wrong with an application but it is being rejected as it is dependent on another application which is being rejected (e.g. a valid Standard Security dependent on a Disposition that is being rejected) then use the following rejection reason "Application dependent on the registration of another application that has been rejected (contains no other error)". There will be NO additional rejection fee for this application.
  • Click Submit.
  • If your case has an LRS Application then at this point you will need to perform the required steps to cancel the LRS application. CMS will show an "Update External Systems" screen as a reminder at this stage.

Next steps for Register OR Plans

  • In LRS, take application on at Legal Cancel.
    • Take a note of the UID that is being cancelled and send an email to finance (Refund@ros.gov.uk) with these details stating that the UID should be made available for representment.
    • Add an N&I note and right click and pick the 'partial cancellation' option.
      • In the box that opens complete the rejection reason and the relevant details of the case then delete any unnecessary boxes.
      • Acknowledge the note.
    • Delete the relevant deed field/line in the application workdesk relating to the deed being rejected.
    • Leave the Move Notes with the CMS Case ID unchanged. 
    • Release the LRS application back to appropriate stage.
  • On CMS, click Submit.
  • On the next screen review rejection reasons and explanation text.
    • If the text does not need to be amended, click Submit.
    • If you need to amend the explanation text click Amend Explanation. 
      • This makes the text editable.
      • If you picked Other as the rejection reason or one of the reasons where text needs to be "deleted as appropriate" then the text will already be editable and there will be no Amend Explanation button.
    • Amend the text as required and click Submit.
  • On the next screen review the notification email addresses and addresses to ensure these are correct. If email details are populated the Rejection letter will be emailed.
    • To modify the notification details click Amend.
      • Update the existing email address or add new ones in. (E.g. if there are additional handwritten email addresses on the form then you should add these at this point).
    • You can also change how the agent will receive the notification i.e. email or post.
      • To change the postal address click 'Add new FAS address' and click Done when you have made the changes.
    • If there is another agent that requires to be notified of the rejection in addition to the presenting agent then also add their email address at this point.
    • If it has been decided that the agent wishes to be communicated with via post and not by email then add instructions for Document Services in the 'Note for Despatch Team' box.
    • Once all correspondence information has been updated, click Submit.
  • The Finalise Rejection Correspondence page is the final opportunity in the process to review and make any amendments to the rejection correspondence.
    • To make changes click 'Amend Correspondence'.
      • Make any relevant changes.
      • e.g. entering the UID for the cheque overpayment type letters or add additional text.
    • Click Save.
    • Click on 'Correspondence' link to toggle back and forth between the correspondence generated and the edit screen if necessary.
    • When the correspondence is accurate, click Submit.
  • On the next screen to finalise the rejection, click Submit.
    • There is an opportunity at this stage to Save or Cancel the rejection.
  • The application(s) that have been rejected will now be titled Rejected in the APF Documents side bar.
  • The rejection letter that has been produced will now appear in the supporting documents section.
  • Contact Sasine Enquiries if any changes are required to the closing note.
  • The other/valid part of the case will now need to be processed as usual.


    • Take on the LRS application and process as appropriate.
    • Complete the case on CMS as appropriate.


Registers of Scotland (RoS) seeks to ensure that the information published in the 2012 Act Registration Manual is up to date and accurate but it may be amended from time to time.
The Manual is an internal document intended for RoS staff only. The information in the Manual does not constitute legal or professional advice and RoS cannot accept any liability for actions arising from its use.
Using this website requires you to accept cookies. More information on cookies.
Feedback