Updating DMS titles in the Plan Creator
- Editor9
- RPT Admin (Unlicensed)
Whilst some updates are essential (for example, the Plan Creator will not allow a title to be approved unless all references are classified), there are some updates that are desirable rather than essential. When considering whether a recommended update should be made, the plans officer should also consider whether making that change would result in a lot of reworking of the title sheet by their legal colleagues.
Required Updates
1 Classification
If you open a version of a title that was originally mapped in the DMS, you will need to classify all polygons and polylines before you can approve the application.
- See the Plan Creator technical guide for how to apply a classification.
- See Further Guidance page on Classification for more details of the most common classifications used.
2 Number and letters connected with polygons or polylines need to be associated
Many features (polygons or lines) that were originally mapped in the DMS also have numbers or text that were added to distinguish them from other features using the same colour reference. For example, green edges and numbers used to show removals from a parent title, blue broken lines between different letters used to show different water pipes on a large farm title, etc.
In the DMS these numbers or text were added as "free text" and were not directly linked to the polygon or line. In the Plan Creator, the labelling function is used meaning that the text or number is directly associated with the polygon or line. The old DMS number or text should be deleted once the references have been correctly labelled in the Plan Creator.
- See the Plan Creator technical guide for how to apply a label to a polygon or polyline reference.
- See Further Guidance page on Using Labels in the Plan Creator for more details on the use of labels.
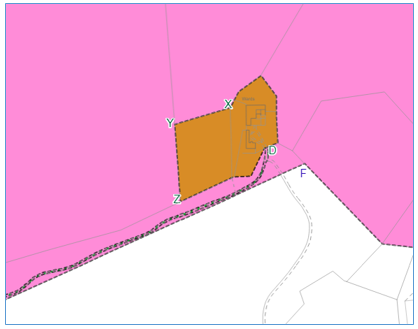
3 Point feature labels
Some point features that were originally mapped in the DMS were shown with a DMS label or just free text. For example, a septic tank arrowed and lettered ST in blue, the location of a spring shown lettered S in blue, a gate arrowed and lettered X in brown, etc.
These DMS labels & text references now need to be re-created in Plan Creator using the Draw Point function. The old DMS label or text should be deleted once the references have been correctly labelled in the Plan Creator.
- See the Plan Creator technical guide for how to provide a reference for a point feature.
- See Further Guidance page on Using Labels in the Plan Creator for more details on the use of the Draw Point function.
4 Boundary burden labels
Many polygons that were originally mapped in the DMS also have text or labels that were added to them to show that a burden applied to a particular boundary of that polygon. For example, a maintenance burden over the stone wall labelled A-B in blue.
In the DMS these text or labels were added as "free text" and were not directly linked to the polygon or line. In the Plan Creator, the labelling function is used meaning that the label is directly associated with the burdened segment of the polygon. The old DMS label or text should be deleted once the boundary burden references have been correctly labelled in the Plan Creator.
- See the Plan Creator technical guide for how to apply a label to a boundary in a polygon.
- See Further Guidance page on Using Labels in the Plan Creator for more details on the use of labels.
5 Ownership polygons should extend beneath burdens polygons
Guidance for the DMS advised that, where possible, that when mapping using the tinting method the plans officer was to ensure that the polygons did not overlap but were to be mapped adjacent to each other.
For example: The subjects are tinted pink and blue, with a burden of a right of access tinted blue - this was mapped in the DMS as two separate pink polygons with a blue polygon in between.
In the Plan Creator, as we now classify polygons, ownership polygons should reflect the full extent of the subjects. When updating a title such as this, the blue tint polygon should be copied so there are two polygons for this area. The two pink tinted polygons and one of the blue tinted polygons should then be merged to form one polygon that is classified as Ownership - Exclusive.
The remaining blue tinted polygon should be classified as Burden.
The polygons should be ordered (see guidance on rendering and ordering of layers in Plan Creator) with the blue burden polygon sitting on top of the pink ownership polygon.
The property section description will remain as "tinted pink and blue on the cadastral map" as this is what can be seen when the cadastral unit extract is viewed by the customer.
6 Island sites need to be cut out of an ownership polygon
There are three ways that an island site will have been mapped in the DMS - each of these will require an update when the title is edited in the Plan Creator.
i. The subjects were mapped in the DMS as a red edge with an island site within the subjects shown as a green tint with external red edge to denote that this area does not form part of the cadastral unit. The update required with this scenario is to change the mapping style to the tinting method. The island site should be cut out of the ownership polygon using the cookie cutter tool or the split tool. Once this has been done, the original green tinted polygon for the island site should be deleted provided it is not narrated in the title sheet for burdens. The Property Section note ‘The land tinted green on the cadastral map is not part of the cadastral unit’ should be deleted.
ii. The subjects were mapped tinting method in the DMS, but a ‘white fill’ polygon sitting on top of the ownership tint was used to denote an island site not forming part of the subjects. The update required with this scenario is to cut the island site out of the ownership polygon by using the cookie cutter tool or the split tool. Once this has been done, the original white filled polygon for the island site should be deleted.
iii. The subjects were mapped tinting method in the DMS, with a reference provided for a burdened area that does not form part of the subjects, but lies within the extent of the subjects. The update required with this scenario is that the burdened area polygon should be cut out of the ownership polygon using the cookie cutter tool or the split tool. Once this has been done, the original burdened area polygon should be retained as a burdens reference. For example; in the image below the subjects are tinted pink but a reference for a dual registered deed has been provided with a brown tint. DMS mapping will have the pink tint extending underneath the brown tinted island site. The extent of the brown tint will need to be cut from the pink tint in Plan Creator so that ownership does not include this area. The brown tinted polygon will be retained and classified as Benefitted Property or Servitude, as appropriate.
7 Non-prescribed references
There may be instances where references that have been added to a title in the DMS do not adhere to the list of prescribed references at Mapping Styles and Plans References used on the Cadastral Map. Examples may include black hatches, cross hatches, pink edges, black broken lines or where a tint colour was incorrectly applied to a hatch reference. If you are working on a title with a non-prescribed reference, these will show as hollow un-styled polygons when the title is opened in plan creator as there is no coding for non standard references. Check the prior version of the title in Plan Viewer to ensure that the un-styled polygon had a plans reference and update / fix this with another appropriate reference from the drop down list of standard references. If necessary, the use of groupings in a complex title may need to be considered.
If any changes are made to existing plans references, an LRS title note must be added advising the legal settler of any change.
8 Enlargements
The use of enlargements or enlarged plans is no longer appropriate. See Further Guidance page Enlargements and Enlarged Plans for how to update an existing DMS title that contains them.
9 SPLs
If a title that was originally mapped in the DMS has an SPL attached, the plotted references will be automatically set up in a grouping if a version of the title is opened in the Plan Creator. Consideration should be given as to whether the references from the SPL should be (a) transferred to the primary ungrouped layer of the cadastral map, (b) incorporated into another existing grouping, or (c) the new grouping retained. In all of these options, the references from the SPL will need to be classified.
See Further Guidance page Groupings for more details on how former SPL references that are included in groupings should be referred to in the updated title sheet as these will normally now be narrated as being shown on an additional cadastral map view.
If any changes are made to the existing plans references for rights or burdens (e.g. formerly shown on SPL-1 but now on the ungrouped primary layer of cadastral map), an LRS title note must be added advising the legal settler of any change that is needed to the text of the title sheet.
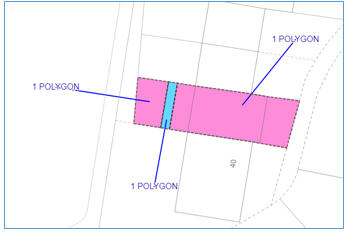
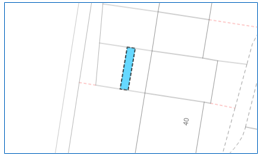
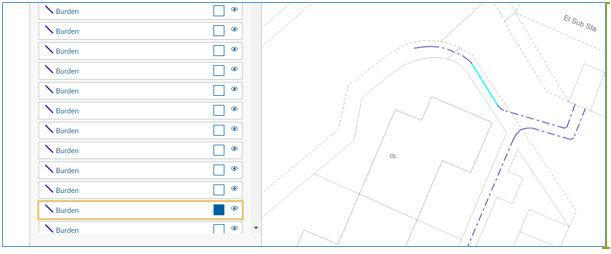
10 Lines may need to be re-created
Poly-line features that have been created as individual line segments in the DMS will need to be re-created using the 'Draw Line' function in the Plan Creator. They will be imported as individual segments from the DMS title, (see the image below), and a new line should be drawn over these segments, snapping onto the vertices as appropriate. Once the new line has been drawn and classified, the original segments should be deleted.
11 Blank empty polygons
Any polygons that appear on the polygon list that do not relate to a reference in the title sheet should be deleted. The most common examples of these are blank or white polygons that were used historically to centre the print view on the DMS or to make a road name visible.
The exception to this rule is when blank polygons have been used to illustrate a row of features (such as parking spaces or coal cellars) to help identify the exact location of the feature included within the title. For example, our parking space is the 4th from the left of a row of 11 parking spaces. Without these empty polygons it can be hard for a customer to identify which space is actually theirs; in addition, it greatly reduces the risk of inaccurate plotting if all spaces are plotted once and then copied through in future applications. Such blank polygons that are being retained should be classified as Reference Only.
If you are unsure whether a particular polygon can be deleted, speak to a referral officer.
12 Rogue labels
There may be rare instances where the original mapping in DMS involved using construction lines and labels to build up the title extent which were then inadvertently SET EXT ("set extent", meaning they show through onto the index map). These may also show when the title is opened in the Plan Creator as shown in the example below. These should all be deleted.
13 Ensure Visibility of references
Check that all references in your title are visible by generating a PDF using the Save & Print function in the Plan Creator.
Check that all references are in the correct order in the polygon list. Automatic layering of references will be as follows from the bottom of the list:- Classified Tints, Edges, Hatches, Lines, Labels, DMS Labels. Key points for Settlers:
- If your polygon is Ownership Exclusive and tinted pink, it should always be at the bottom of the polygon list so that any burdens tints sit on top of it.
- Ensure that there are no overlapping edges as this is only appropriate in large continuing developments; all other titles must be mapped with no overlapping edges, making use of Groupings where necessary.
- Ensure that all label text is visible in relation to other references and the base map.
Recommended Updates
14 Plot references from scanned supp plans
- If the references shown on a scanned supplementary plan pertain to ownership, then, if possible and practical to do so, they should be plotted onto the cadastral map. If there is any doubt, seek guidance from a referral officer.
- If the references shown on a scanned supplementary plan are not ownership, but can be plotted onto the cadastral map, e.g. a servitude route or Deed of Conditions references, then, if practical to do so, they should be plotted onto the cadastral map. If there is any doubt, seek guidance from a referral officer.
- If the references shown on a scanned supplementary plan cannot be plotted onto the cadastral map, then follow the guidance at Assigning Scanned Plans for how to handle the scanned image in connection with your application in the Plan Creator.
More guidance (including the useful checklist which is also found below) on when to plot references or retain a scanned image can be found on the Further Guidance page relating to Supplementary Data, SPLs, etc.
If changes are made to how some references are shown (e.g. they were on a scanned image, now plotted on the cadastral map), the plans officer must provide details of all changes to the legal officer so the text of the title sheet can be updated accordingly. Remember, if a grouping is used to show references that were once on a scanned supplementary plan, then these are to be described as being shown on an additional cadastral map view - further details on naming conventions can be found on the Groupings guidance page.
For example, an LRS Title Note should be added along the following lines -
"The scanned supplementary plan to the title plan (number) has been deleted with references now plotted onto additional cadastral map view 1.
Supplementary Plan Reference - Additional cadastral map view 1
Coloured red - tinted pink
Coloured yellow - tinted yellow."
15 Double or triple edging, and flipped edges
Mapping in the DMS for complicated titles may have used double or triple edging, or flipped edges to reflect the various references required to construct the title. These will not show correctly in the Plan Creator and therefore the titles should ideally be re-mapped. To facilitate this, Groupings may be required to make the title legible and easy to understand. Please speak to a Plan Creator business lead or referral point if you are unsure how to proceed.
Where the update is not possible, the existing style can be retained by making use of the Edge Stacking Tool - see the guidance on that page for the scenarios where it is appropriate to retain the existing style.
If any changes are made to the existing plans references (e.g. formerly shown edged brown on the ungrouped primary layer of cadastral map but now tinted yellow on an additional cadastral map view), an LRS title note must be added advising the legal settler of any change that is needed to the text of the title sheet.
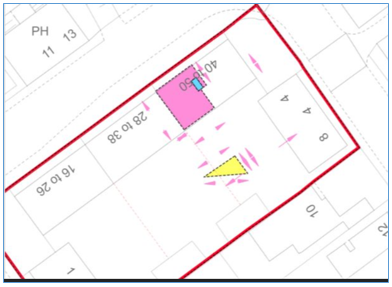
16 Lack of clarity of references
It may be the case that the choice of references when the case was originally mapped in DMS makes the clarity or visibility of references poor.

For example, in the image above, the access road (which is a burden on our title) is hatched green which is not very clear at the print scale. Use of hatches for small or narrow areas should be avoided where possible as the extent of the references can be unclear. It would be preferable to use a tint to reference the access road, or other similar references. Guidance page Mapping Styles and Plans References used on the Cadastral Map covers appropriate uses of different references in more detail.
If there are multiple references for access roads burdening the subjects then they can all be tinted the same colour but either
- label the polygons so they could be described as e.g. tinted blue and labelled 1, tinted blue and labelled 2 etc., or
- use the boundary function to add letters to denote the start and end of an access road or sections of a road, so they could be described as e.g. tinted blue between the points lettered A and B
See Labelling in Plan Creator for guidance on how to do this.
If any changes are made to the existing plans references (e.g. formerly shown hatched green on the cadastral map but now tinted yellow and labelled 2 in yellow on the cadastral map), an LRS title note must be added advising the legal settler of any change that is needed to the text of the title sheet.
17 Change from red edging of large land titles to tinting method
To assist the positive mapping of future transfers of part (TPs) from an area of land, it may be helpful to change mapping style from red edge to tinting method.
There is no need to change the mapping style of house plots, etc, only larger parcels of land that may be developed, or larger titles such as farms or estates where there is more chance of a TP being received.
This allows future TPs that lie within the extent of the parent title to be positively removed (i.e. cut out of the cadastral unit) providing a clear representation of what remains in the title. This saves time at TP stage as no changes would be required to the mapping style of the parent title when the first removal is processed, in effect, future proofing the title on forward conversion from the DMS.
Registers of Scotland (RoS) seeks to ensure that the information published in the 2012 Act Registration Manual is up to date and accurate but it may be amended from time to time.
The Manual is an internal document intended for RoS staff only. The information in the Manual does not constitute legal or professional advice and RoS cannot accept any liability for actions arising from its use.
Using this website requires you to accept cookies. More information on cookies.
Feedback