This is the registration manual for 1979 casework.
Do not under any circumstances use the information here when settling 2012 casework. This resource has been archived and is no longer being updated. As such, it contains many broken links. Much of the information contained here is obsolete or superseded.
P13.7 SUPPLEMENTARY PLANS
- Former user (Deleted)
- Admin2 (Unlicensed)
Analytics
When do I use a Supplementary Plan?
A supplementary plan is used in conjunction with the Title plan for the purpose of showing detail or providing a method of reference to areas of land mentioned in the register which, for reasons of scale, size or complexity, cannot conveniently or satisfactorily be shown on the Title Plan.
For more detailed guidelines on specific topics see Plans Manual as follows
A. Property Section Section 8.10.7.4.
B. Floor level Section 8.4 6.
C. General Section 8.2.23.
D. Site Plan in Tenements Section 8.3.4.
E. To show Burdens References Section 8.2.13.3.
F. To show Complex Servitudes Section 8.9.6.3 and 8.9.6.4.
G. To show Rights in Large Estates Section 8.9.3.
When do I use a Supplementary Plan based on an image?
The image will normally be a copy of the deed plan and in the following circumstances
- Where detail is required to be shown but which would be too small to be clearly shown on the Ordnance map and covers an area that would not be feasible on an enlargement
- Where detail is required to be shown but it is not feasible on a Supplementary Plan based on the Ordnance Map (SPL).
- Where copy and certificate method is being used.
- Where there is four or more floor levels that require separate references and inset plans are not a feasible option.
- Where a style already exists for property using image
- To show removals /feus of parts of references for transfers at different floor levels
When do I prepare a Supplementary Plan based on the Ordnance Survey Map (SPL)?
- When there are too many references to have them all clearly shown on the Title Plan.
- Where a style already exists for property using an SPL
ANNEX 1 - APPLICATION FORM TO SCAN SUPPLEMENTARY PLAN
ANNEX 2 - CONVERSION ERROR REPORT
How do I get an image scanned
A copy of the deed plan reduced to slightly less than A4 (a 1cm border is added by the system when printed) where practical should be sent to Mapbase Maintenance Section with the appropriate form namely a P2 and is titled APPLICATION FORM TO SCAN SUPPLEMENTARY PLAN (See annex 1)
Please ensure you read all the guidance notes on the form before completing it. Also if appropriate please enhance colours on the plan, as due to the limitations of the DMS, the original quality will deteriorate.
If you are unable to reduce the plan to A4 Mapbase Maintenance will scan it into the system in A4 sections with a slight overlap between sections. Therefore when the Supplementary Plan is printed it will require cutting and backing.
What do I do now that the image is scanned into the system?
- Complete mapping of the Title Plan for your application but do not authorise the case
- Choose Images from the Top Level Syntegra menu.
- Choose Image Assignment. A form will appear with your current case shown in the Title Number field.
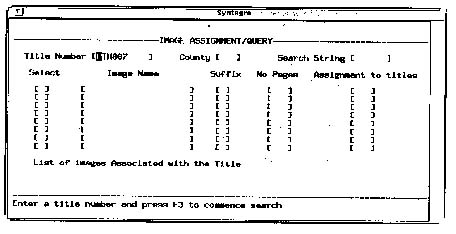
- Using the Tab Key to move the cursor, Fill in the field with the County Prefix of the Supplementary Plan you wish to assign to your Title (e.g. PTH, FFE, GLA, LAN etc).
- Fill in the field called Search String with the numeric part of the image name you wish to assign to your title (e.g. 867)
- Throughout the use of this form the system will give action prompts and list specific function keys at the bottom of the window. Press F3 to commence search. A list of supplementary plans will appear that contain the Search string queried
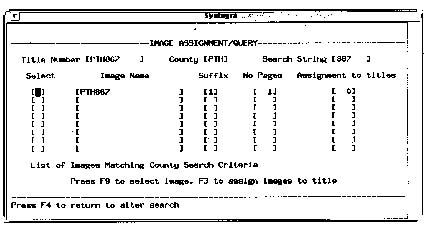
- If more than one Image is displayed use the arrow keys to tab the cursor up/down the select list to the Supplementary Plan required
- Press F9 to associate the Supplementary Plan with the Title. An X will appear in the Select column against the entry.
- Press F3 to Assign the Supplementary Plan Image with your title. The system will create links between your title and the assigned image. Note that the Assignment to Titles column will change.
- If more than one Image is required from the list repeat steps 8 and 9.
- Press F4 twice to return to Images Workdesk.
- Select Image Assignment again, as you must now make the selected Image current in the Image Tool. The Title Number and Assigned Image for your title will be displayed. Follow prompts on the bottom of the screen.
- Press F9 to select Image - an X will appear in the Select column.
- Press F5 to make this the current image in the Image Tool.
- Use Exit to close down the Drawing Tool.
- Click the right hand mouse button in the blue screen and select Image Tool from the pop up Workspace Menu.
- The Image Tool will open with the required Supplementary Plan Image displayed in View. Please note that the colour of the Image Tool may change from the standard blue.
- Click on Open. The image will move from View to Edit.
- Click on Stamps to activate stamps window Using the left-hand mouse button you can click on the stamps to select and position stamps on Supplementary Plan. If required use the General Controls - Move, Scale, Delete etc, to make amendments and adjustments.
List of Stamps. (Stamps do not always display in Image Tool sometimes only the outline is shown).
- Stamp 1 - Header for Image.
- Stamp 2 - Note: this copy is a reduction of the original plan.
- Stamp 3 - Supplementary Plan to the Title Plan.
- Stamp 4 - Blank Box (Used to cover unwanted parts of the scanned image).
If there is more than one Supplementary Plan attached to your Title amend the "Supplementary Plan to the Title Plan" stamp with the addition of the Supplementary Plan Number after the wording "Supplementary Plan" using the Text facilities
- Click on Save
- Select Close and then Exit to close the Image Tool.
- Call up the Drawing Tool and use Case Take-on to select your current case.
- If everything is in order select Close and Authorise, and authorise case as normal.
How do I assign a Supplementary Plan that is an existing image to a Title?
- Complete mapping of the Title Plan for your application but do not authorise the case
- Choose Images from the Top Level Syntegra menu.
- Choose Image Assignment. A form will appear with your current case shown in the Title Number field.
- Using the Tab Key to move the cursor, Fill in the field with the County Prefix of the Supplementary Plan you wish to assign to your Title (e.g. FFE, GLA, LAN etc).
- Fill in the field called Search String with the numeric part of the image name you wish to assign to your title (e.g. 1234)
- Throughout the use of this form the system will give action prompts and list specific function keys at the bottom of the window. Press F3 to commence search. A list of supplementary plans will appear that contain the Search string queried, for instance search string 1234 for GLA will have the following result:-
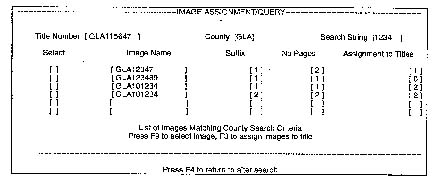
- If more than one Image is displayed use the arrow keys to tab the cursor up/down the select list to the Supplementary Plan required
- Press F9 to associate the Supplementary Plan with the Title. An X will appear in the Select column against the entry.
- Press F3 to Assign the Supplementary Plan Image with your title. The system will create links between your title and the assigned image. Note that the Assignment to Titles column will change.
- If more than one Image is required from the list repeat steps 8 and 9.
Please note there is no need to access the image on the image tool, as all stamps etc. would have been added when image was first scanned into system. No changes should be made to the image, as only one image is held in the system but is linked to numerous Titles, any changes would affect all previous Titles.
How do I print a Supplementary Plan that is an image?
- From Top Level Menu choose Title _Admin.
- Choose Select a title version to Print.
- Type in the Title Number of your application in the field marked Title Number
- Press F3
- If more than one version select the version you wish to print by moving the cursor accordingly
- Press F3. A window will appear:
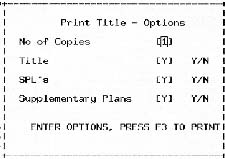
- Where appropriate change Y to N. Press F3. Your request will be processed and sent to your default colour printer.
Please note: the Title Image Viewer can also be used to print an image
What do I do if the image I want to use is already scanned and forms part of a back converted multiple image stored under one suffix?
Sometimes a Title has more than one Supplementary Plan, as part of the back conversion program the Supplementary Plans attached to a Title were all scanned under one file/suffix. However applications for First Registrations of other properties may only require one of the Supplementary Plans in that file.
Therefore in order that this can be rectified complete a back conversion error report form (See Annex 2) with your requirements. Send the form to Mapbase Maintenance, who will obtain the original Supplementary Plans from storage and rescan under separate suffixes
How do I get an image removed from the system, as it is no longer required?
Complete a P2 form (See Annex 1) stating that you wish the image to be deleted and send it to Mapbase Maintenance.
Please note that when an image is deleted from the system it is deleted from ALL titles it is attached to.
How do I create a Supplementary Plan based on the Ordnance Survey Map?
- From the Top Level Menu choose the NAP.
- Choose Create Index entry.
- Enter an Index type -SPL (F2 to List available Index Types and F3 to accept highlighted choice).
- Press the Tab key to move to the Index ID field
- Enter the Title number for of the application the Supplementary Plan is to be attached to plus the running number of the Supplementary Plans attached to that application i.e. FFE6001-1. (If you are in any doubt as to whether there are SPL's attached to your Title by a previous user use "View SPL's assigned against a Title" option in the Images menu to see)
- Press F3 to create the index.
- Go to drawing tool and press Case Take-on to select the SPL you have just created.
- This will activate the Manual PI form:
- Select Title Details by click on the button with the left hand mouse button.
- Enter the Title Number of the application the supplementary plan is to be attached to and press return. Now click on SEARCH with left hand mouse button (This will place the seed point for the SPL in exactly the same position as that for the title, so that on Index map searches the title and the SPL will have the same marker). If the Title Details doesn't work then use the Address of the property and when mapping the SPL ensure that the seed is stacked on top of the seed point in the Title
- When the search is complete a dialogue box will appear asking for confirmation. Select YES.
- SPL will now open on the Drawing Tool.
- Map the SPL. Remember to check PRINT PREVIEW for road names etc.
- Please note that you NO longer need to add the header stamp, the north point/scale stamp or the stamp "supplementary plan to the title plan" as this information is all added automatically at the batch printing stage
- Ensure the correct "Print Scale" has been selected on the Drawing Tool. (System will automatically print any requests for the Supplementary Plan at this scale once case is authorised )
Consideration should be given to use the Print Scale of 1/10,000 if the area involved is large - Click Close and Authorise and authorise index in the normal fashion
How do I assign the SPL or an existing SPL to my Title?
An SPL has to have been authorised before it can be assigned to a Title.
The title to which the SPL is to be attached should not be authorised but be the users current application.
1. From the Top Level Menu choose IMAGES.
2. Choose Assign SPL's to a Title, the following form will appear with your current case shown in the case and title fields. Follow prompts at the bottom of the window.
An SPL has to have been authorised before it can be assigned to a Title. The title to which the SPL is to be attached should not be authorised but be the users current application.
- From the Top Level Menu choose IMAGES.
- Choose Assign SPL's to a Title. A form will appear with your current case shown in the case and title fields. Follow prompts at the bottom of the window.
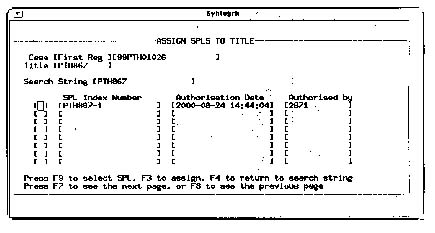
3. In the field marked Search String enter the number of the SPL you wish to assign (This is the number the SPL was created under).4. Press F5. This will locate all Supplementary Plans with that title number.
5. Move cursor to select required SPL and press F9, an X will be displayed in the Selection field to show that the SPL has been selected. (Pressing F9 again will deselect the SPL). If there is more than one SPL to be assigned, select them also by using the F9 function.
6. Press F3 to assign all selected SPL's. You will then be prompted to ensure the selections made are correct, type in y or n as appropriate and then press Return.
7. Press F4 to return to Top Level Menu.8. You can now proceed with Title Plan as normal
Please note: - when the SPL's are printed (see next section for instructions) the system will print the identifier number automatically in the header using the following format" <title number> -x", where x is the sequential count of the total number of SPL's assigned against the Title. The SPLs will be printed in the order in which they were associated with the title.
For example:
The first SPL associated with title FFE01234 will have name "FFE01234-1"
the second "FFE01234-2"
the third "FFE01234-3".This number will not be associated with the SPL and only be used for the batch print to identify the SPLs associated with a title.
Changes can be made to SPLs i.e. map updates without unassociating the SPL from the Title. Any changes made will not affect the identifier number of the SPL when printed
If an SPL is updated in any way this change will be reflected in all Titles.
If a link between a Title or an SPL is deleted any subsequent SPL's attached to that Title will be re numbered accordingly
How do I print a SPL?
- From Top Level Menu choose Title _Admin.
- Choose Select title version to Print.
- Type in the Title Number of your application in the field marked Title Number
- Press F3
- If more than one version select the version you wish to print by moving the cursor accordingly
- Press F3. The following window will appear:

- Press F3. The Title Plan and all attached SPL's will be sent to your default colour printer.
Can I use the Ad Hoc facility to print of my SPL?
The ad hoc print facility on the Drawing Tool facility can only be used to print of SPL's on the permission of RO1 Plans, and should only be used in exceptional circumstances.
In order to assist you decide if ad hoc print is appropriate please ask yourself the following questions, if you can answer YES to ALL three questions/statements then consideration should be give to printing using ad hoc facility.
- Is area involved going to produce a large number of flaps?
- I have considered using the print scales of 1/2500 or 1/10,000 which will reduce the number of flaps but the SPL will still contain a large number of flaps or the detail will be too small to be seen.
- I have a run of cases in same development that if I print off Supplementary Plans as they presently stand under the batch print process I will have a large number of multi flap plans that require to be cut and backed.
If you answer NO to any of these questions/statements then the SPL must be printed using the batch print process and then sent to Mapbase Maintenance for cutting and backing
If you have answered YES to ALL the questions the Ad hoc printing process can be used as follows:
- Create and map the SPL as normal.
- Click on PRINT to open up the Print Settings window.
- Select Manual setting and A4.
- Click on Ad Hoc
- Define the area you wish to include on your A4 print by clicking, using the left hand mouse button, on the map view at the bottom left hand corner followed by the right hand corner (an elastic rectangle will appear after the first click) of your intended A4 print.
- The Print Preview window will now appear
- Click on Stamps
- Add the following stamps to your print "Header" stamp "Supplementary Plan to the Title Plan" stamp and "north point" stamp any scale will do.
- Close down print preview and return to map view screen locate position of north point Stamp and select and then select Ungrp from the Miscellaneous Controls window on the button panel.
- Click the Done button to deselect all objects
- Select the scale object ( i.e. wording 1/2500 or 1/1250) from the stamp and select Delete
- Authorise the SPL in the normal way by clicking on Authorise and Close.
- Click on View and click on PRINT
- Select Manual and Ad Hoc print, defining the area you wish to include as in step 5 and select Print from print preview screen
- Once the Supplementary Plan is printed dismiss print windows and click on View
- Click on Case Take on and select the SPL, unauthorise SPL when prompted.
- Select all the stamps on map screen and click on DELETE
- Reauthorise SPL and assign it to the Title as per previous instructions
If office copy requests are received these will now be batched printed and sent to Mapbase for cutting and backing (no large run at office copy request stage)
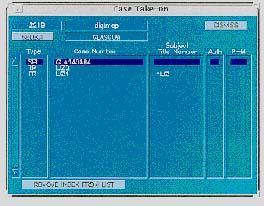
How do I remove the SPL from my select list when I have authorised it?
1. Go to the Drawing Tool and Select Case Take-on
2. Select the SPL in your list you wish to remove
3. Then click on Remove Index From List
What do I do if I create an SPL in error?
Contact IT through the Help desk with your details i.e. CPF number and that of the SPL. IT will then delete all record of the SPL.
When I use the Duplicate Title Functionality are images and SPL's attached to the Title duplicated as well?
Yes, the link to the Supplementary Plans, whether an image or an SPL, is duplicated therefore you require to take no further action in respect of the Supplementary Plan. However if you do not require the image to be associated against your Title you will have to go into IMAGES and unassign the Supplementary Plan.
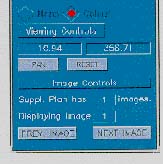
When do I use the Title Image Viewer?
The Title Image Viewer allows you to view and print any authorised Supplementary Plans based on an image that are attached to an authorised title which is not your current case
How do I use the Title Image Viewer?
1. Exit the Drawing Tool
2. Select Title Image Viewer from the Pop-up Workspace Menu.
3. In the field under Title Details click the left hand mouse button.

4. Type in the Title Number of the authorised Title whose image you wish to view.
5. Press Return
6. The list box will display the image name etc for each Supplementary Plan attached to the Title Number.
7. Use the Previous Image and Next Image to select the required image
What notes do I add to case notes when a Supplementary Plan is used?
When you use a Supplementary Plan of any description you must add a note to the case notes as follows:
"An SPL/image Supp Plan has been used in conjunction with this Title."
The note can be expanded to state why the Supplementary Plan was used if required. On subsequent applications the mapper will be aware that Supplementary Plans were used if they follow the mapping style of your Title.
What do I do when I have to add an SPL to an existing Title, which already has both SPL's and Images?
As the system automatically numbers the SPL's in the order that they were assigned and does not recognise any images which may be attached. Therefore the images will have to be renumbered and the legal settler informed on the new numbers so the text of the Land Certificate can be amended accordingly.
How do I number images when I have more than one Supplementary Plan?
Stamp 3 - "Supplementary Plan to the Title Plan" has been designed so that a number can be added electronically after the words Supplementary Plan
On the Image Tool toolbar there is a field marked number. Use the arrow buttons to the right of the field to select the number of the Supplementary Plan this number will appear in the stamp on the Title Plan. It does not matter whether the stamp is added before or after the number is selected either way it will appear in the stamp.

This number is stored against the title and not the image viewed. Therefore where the supplementary plan to be attached to your title has already been attached to another title but requires to have a different number then this number can be changed without any change occurring on the prior title(s) to which the image has been attached.
Related content
*
This is the registration manual for 1979 casework.
Do not under any circumstances use the information here when settling 2012 casework. This resource has been archived and is no longer being updated. As such, it contains many broken links. Much of the information contained here is obsolete or superseded.
*
The Manual is an internal document intended for RoS staff only. The information in the Manual does not constitute legal or professional advice and RoS cannot accept any liability for actions arising from its use.
Using this website requires you to accept cookies. More information on cookies.